Categories

Professionals use SPL meters to calibrate audio reproduction systems in cinemas, so why shouldn’t home cinemas or home theaters use them too? TestCard ProHD is the innovative means to calibrating your screen and audio to ensure a consistent and correct representation of display media and surround sound and includes an SPL meter.
Now the very same SPL meter that’s in TestCard ProHD is available separately. This SPL or “decibel” meter is an essential tool when setting up surround sound systems. Home Theater SPL a solution for calibrating the audio level of surround sound systems within the home without the need for expensive additional equipment.
Surround Sound Level Setting.
An SPL, or “Decibel” meter, is a sound power meter to assist with setting the speaker levels. As speakers have different sensitivities they produce different levels of audio. One may be louder or quieter than another, and how the room is laid out will also have an effect, but the goal is to have similar levels from all speakers reaching the viewing position.
To create a “centered sound stage” it’s important to calibrate the system. While an approximation may be possible by ear, it is best done with an SPL meter. A second factor to consider is simply that it also verifies that each speaker is in the correct position! While working on an initial installation it is imperative to verify that audio is emanating from the selected speaker.
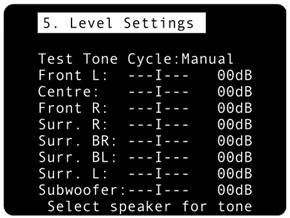
TVs with built in surround sound, or separate amplifiers, will have a set-up menu for adjusting the levels. Below is an example from an Arcam Home Cinema Receiver. When the highlighted block is moved to a speaker a white noise, like static noise, is produced from the respective speaker.

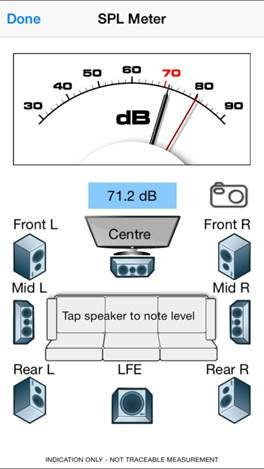
Select SPL on the main screen of Home Theater SPL to launch the meter. Turn the iPhone or iPad so that the bottom microphone is pointing upwards and hold at ear level. The scale is fixed, and the main black needle gives a slow average response as desired. A red needle is provided for peak noise level information and is not used during calibration, as per the image below.

Start with the front left speaker and allow it to set the benchmark level; the target for all other speakers to be set to. Typically the audio will be in the 70-80dB range and as a guide 70dB is marked in red on dial. No other significance on 70dB should be made other than it verifies that audio is being produced and detected so that you can proceed with the calibration process. With Home Theater SPL it is possible to note the current sound level by tapping on respective speaker, making it easier to recall where individual speakers were.
Move to the center speaker and adjust its level to closely match the first. It is normal for amplifiers to increase or decrease sound levels by 1dB increments and it may not be possible to get an exact match. As a guide our personal preference is to have the center and surround channels on the plus side of the main left and right speaker levels. This is because dialogue mostly comes from the center channel, and we enjoy surround sound effects. Move to the next speaker in the list and repeat. Variance of 1 or 2dB during calibration is normal, but it will settle around a value.
Some systems will have 5 speakers and some will also have the LFE, or bass effects, speaker to give the “0.1” to make 5.1 audio. With the SPL meter there are 7 main speakers shown with one LFE to make 7.1. With our example of an Arcam system we have 7 main speakers, with Surround and Surround Back listed, which would be Mid and Rear within the SPL meter view. With a 5.1 system the Mid speakers will not be present and therefore can be skipped.
Although the LFE channel can be tested and its level set with TestCard ProHD, our own experience over decades of Home Theater ownership would suggest that if the result is booming bass during films then it’s best to turn the subwoofer down. Some systems simply don’t have a dedicated LFE bass speaker but instead rely upon the main speakers for bass effects. With quality full range speakers this is perfectly valid.
When complete ensure that you save the settings within the amplifier if they’re not automatically saved. For reference a screen shot of the SPL meter on Home Theater SPL can be taken to record any stored audio level by pressing the camera button.
Photographs Used Within Home Theater SPL
Valve image used within Home Theater SPL is © UCL Mathematical and Physical Sciences. Used under the Creative Common License for Attribution. Source https://www.flickr.com/photos/uclmaps/14370402740/
Home Theater SPL
Available on the App Store:
Cart
Top sellers
- Digital Audio Lip Sync Delay
- Active SCART Buffer V3 (Amplified splitter)
- Digital Audio Delay (Lip Sync)
- RGB (SCART) to S-Video Converter
- HDMI to YUV / YPbPr Converter with L&R Audio
- HDMI to SCART Converter
- HDMI to S-Video and Composite Converter
- Simple Video Scalar, Spec B
- Active COMPONENT Buffer (Amplified splitter)
- Master SCART Controller (Switcher)


